Bake Perfect Chewy Chocolate Chip Cookie Cups: Your Easy Guide to Irresistible Treats
Imagine the ultimate chocolate chip cookie: crisp at the edges, delightfully gooey in the center, studded with molten pockets of chocolate. Now, picture all that irresistible goodness perfectly portioned and shaped like a muffin. Welcome to the wonderful world of chocolate chip cookie cups! These playful, incredibly satisfying treats offer the best of both worlds, transforming a timeless classic into a fun, shareable, and utterly addictive dessert.
Whether you're a seasoned baker or just starting your culinary journey, mastering the art of the perfect chewy chocolate chip cookie cup is surprisingly straightforward. This guide will walk you through every step, from selecting the right ingredients to the final golden-brown bake, ensuring each bite delivers that coveted balance of chewiness and melt-in-your-mouth delight. Get ready to impress your family and friends (or simply treat yourself!) with these convenient and utterly delicious confections.
The Magic Behind Perfect Chewy Chocolate Chip Cookie Cups
Crafting the ideal chocolate chip cookie cup isn't just about following a recipe; it's about understanding how each ingredient contributes to the final texture and flavor. The goal is that signature chewiness, coupled with crisp edges and a soft, slightly underbaked center. Here's what makes these cookie cups truly shine:
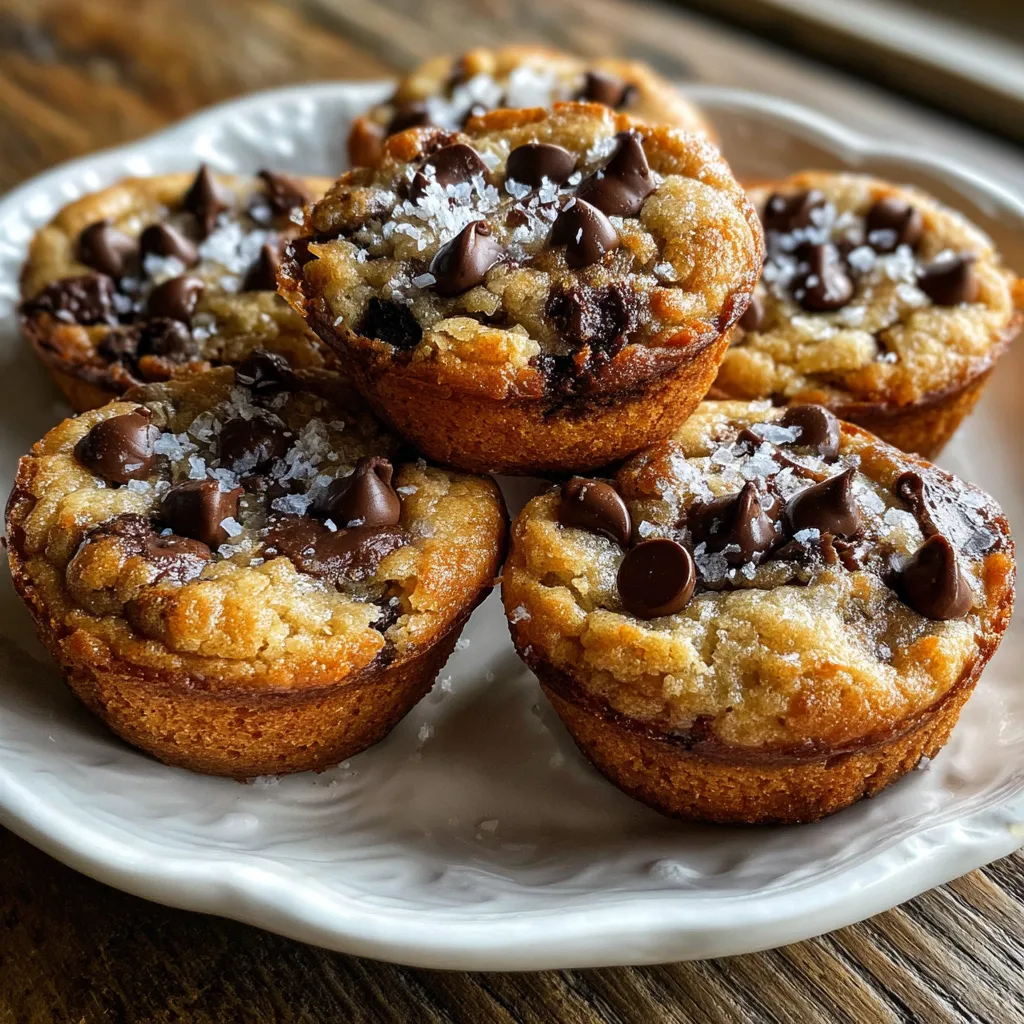
- Crispy Edges, Gooey Centers: The muffin tin naturally creates a structure that allows the edges to crisp up while protecting the center, keeping it wonderfully soft and moist.
- Portion Perfection: No more unevenly sized cookies! Each cup is a perfectly portioned dessert, ideal for gatherings, lunchboxes, or a controlled indulgence.
- Beginner-Friendly: With clear steps and common ingredients, this recipe is incredibly forgiving and yields fantastic results every time.
Essential Ingredients and Their Purpose
The foundation of any great cookie lies in its ingredients. For our chewy chocolate chip cookie cups, each component plays a vital role:
- 3/4 cup Unsalted Butter, Softened: Butter provides richness and flavor, but its softened state is crucial for proper creaming. This process incorporates air, leading to a lighter, more tender cookie texture. Make sure it's soft enough to indent easily but not melted.
- 3/4 cup Granulated Sugar & 3/4 cup Packed Brown Sugar: This combination is key to achieving that perfect chewy texture and balanced sweetness. Granulated sugar helps with crispness and spread, while brown sugar (specifically packed) adds moisture, depth of flavor (with its molasses content), and that signature chewiness. The ratio here leans into chewiness.
- 1 Large Egg & 1 Large Egg Yolk: The whole egg acts as a binder, providing structure. The addition of an extra egg yolk is a secret weapon for chewiness and richness! It adds extra fat without extra liquid, making the cookie more tender and dense.
- 1 Teaspoon Vanilla Extract: A classic flavor enhancer that infuses warm, sweet notes throughout the dough. Don't skimp on good quality vanilla!
- 2 cups All-Purpose Flour: The structural backbone of our cookie cups. Measure it correctly by spooning it into your measuring cup and leveling it off, rather than scooping directly from the bag (which can compact it and lead to too much flour).
- 1 Teaspoon Baking Soda: This leavening agent helps the cookies rise slightly and contributes to their tender crumb. Ensure your baking soda is fresh for optimal results.
- 1/2 Teaspoon Salt: Essential for balancing the sweetness and enhancing all the other flavors. It's a small but mighty ingredient.
- 1 1/2 cups Semisweet Chocolate Chips: The star of the show! Semisweet chocolate chips melt beautifully, creating those irresistible pockets of gooey, molten chocolate. You can adjust the type of chocolate to your preference (milk, dark, or a mix).
Mastering the Dough: Tips for Success
The dough is where the magic truly begins. Paying attention to these few techniques will ensure your chocolate chip cookie cups turn out perfectly every time:
- Creaming Properly: Don't rush this step. Creaming the softened butter with both sugars until light and fluffy (2-3 minutes on medium speed) incorporates air, which is essential for a tender, chewy result.
- Don't Overmix the Flour: Once you add the dry ingredients to the wet, mix only until no streaks of flour remain. Overmixing develops the gluten in the flour, which can lead to tough, dense cookie cups rather than tender ones.
- Gentle Folding of Chocolate Chips: Use a spatula to fold in the chocolate chips. This ensures even distribution without overworking the dough.
- Ingredient Temperature: Ensure your butter and eggs are at room temperature. This helps them emulsify properly, leading to a smoother, more uniform dough.
Step-by-Step Guide to Baking Your Cookie Cups
Baking these chocolate chip cookie cups is a rewarding experience, producing a batch of golden, irresistible treats. Follow these detailed steps to achieve perfection:
- Prepare Your Oven and Muffin Tin: Preheat your oven to 350°F (175°C). This temperature ensures a good balance of crisp edges and a chewy interior. Generously grease a standard 12-cup muffin tin with butter or non-stick spray. This is crucial to prevent sticking and allow for easy removal of your delicate cookie cups.
- Cream Butter and Sugars: In a large mixing bowl, combine the softened unsalted butter, granulated sugar, and packed brown sugar. Using an electric mixer (handheld or stand mixer) on medium speed, cream them together for about 2-3 minutes. The mixture should become noticeably lighter in color and fluffy in texture.
- Incorporate Wet Ingredients: Beat in the large egg, extra egg yolk, and vanilla extract. Mix until the ingredients are fully combined and the mixture is smooth and cohesive.
- Combine Dry Ingredients: In a separate medium bowl, whisk together the all-purpose flour, baking soda, and salt. Whisking ensures these dry ingredients are evenly distributed, preventing pockets of unmixed leavening or salt.
- Gradually Add Dry to Wet: With your mixer on low speed, gradually add the dry mixture to the wet ingredients. Mix just until no streaks of flour are visible. Remember, avoid overmixing!
- Fold in Chocolate Chips: Remove the bowl from the mixer and, using a rubber spatula, gently fold in the semisweet chocolate chips until they are evenly distributed throughout the dough.
- Shape the Cookie Cups: Scoop tablespoon-sized portions of dough. Press each portion firmly into the bottom of each greased muffin cup, then gently press the dough up the sides of the cup, forming a small well in the center. This shaping is key to creating that "cup" effect with the crisp edges.
- Bake to Perfection: Place the muffin tin in your preheated oven and bake for 11 to 13 minutes. You'll know they're ready when the edges turn golden brown, but the centers still look slightly soft and maybe even a little "underbaked." This ensures that incredible chewiness.
- Cool and Serve: Allow the chocolate chip cookie cups to cool in the muffin tin for at least 5 minutes. This cooling time is crucial as it allows them to set and firm up, preventing them from breaking when removed. After 5 minutes, carefully transfer them to a wire rack to cool completely. For an extra treat, serve them slightly warm, allowing the chocolate to remain perfectly gooey.
Elevate Your Cookie Cups: Tips, Tricks, and Variations
While the classic chewy chocolate chip cookie cup is divine on its own, there are endless ways to customize and enhance your creation:
- Chocolate Variety: Experiment with different types of chocolate! Use milk chocolate for a sweeter profile, dark chocolate for a richer, more intense flavor, or even white chocolate chips. A mix of different chocolates adds complexity.
- Add-Ins: Fold in chopped nuts like walnuts or pecans for extra crunch and flavor. Sprinkles can add a festive touch, especially for birthdays. A sprinkle of flaky sea salt on top right after baking can elevate the flavors beautifully, balancing the sweetness.
- Fillings & Toppings: Once the cookie cups are slightly cooled and still warm, you can gently press down the center to create a deeper well. Fill these wells with a dollop of peanut butter, caramel sauce, marshmallow fluff, or a scoop of your favorite ice cream. For a truly decadent dessert, drizzle with hot fudge or a cream cheese frosting after they've cooled completely.
- Mini Cookie Cups: For bite-sized delights, use a mini muffin tin. Adjust baking time down to 8-10 minutes, keeping an eye on those golden edges.
- Troubleshooting Common Issues:
- Sticking to the pan? Ensure your muffin tin is very well greased, and allow adequate cooling time in the pan before attempting removal.
- Too dry or crumbly? You might have overbaked them or added too much flour. Next time, pull them from the oven when the centers are still soft.
- Too flat? Check your baking soda's freshness and ensure your butter isn't too warm/melted when creaming.
For more specific insights into achieving the perfect texture, exploring Chewy, Gooey, Crispy: The Ultimate Chocolate Chip Cookie Cups can provide even deeper understanding.
Storage and Enjoyment: Keeping Your Cookie Cups Fresh
These chocolate chip cookie cups are best enjoyed fresh, but they also store well, allowing you to savor them over a few days.
- Room Temperature: Store cooled cookie cups in an airtight container at room temperature for up to 3-4 days.
- Freezing: For longer storage, freeze cooled cookie cups in an airtight container or freezer bag for up to 2-3 months. Thaw at room temperature or gently warm in the microwave or oven (300°F/150°C for 5-7 minutes) for that fresh-baked feel.
- Reheating: If you want to recapture that warm, gooey chocolate experience, pop a cookie cup into the microwave for 10-15 seconds or in a preheated oven at 300°F (150°C) for a few minutes.
Conclusion
Baking chocolate chip cookie cups is more than just making a dessert; it's about creating a moment of joy and indulgence. Combining the beloved flavors of a classic cookie with the convenient, fun shape of a muffin tin makes these treats a surefire hit for any occasion. With their crispy edges, perfectly chewy centers, and pockets of molten chocolate, they are truly irresistible. So, gather your ingredients, follow this easy guide, and prepare to delight your taste buds with these perfect, portioned bundles of happiness. Happy baking!
